Image Search Techniques Explained: A Detailed Guide

Image search has become one of the easiest ways to find information online, and it works because of smart image search techniques.
Image Search techniques help search engines understand what is inside a picture without needing any text. Instead of typing long descriptions or trying to guess the right keywords, people can upload a photo or take a quick picture on their phone. The search engine then uses these techniques to compare the image with millions of others and show related results in just a few seconds.
What Image Search Is and Why People Depend on It Today
Image search is a tool that helps users find information through pictures instead of relying only on text. When a person uploads a photo or shares an image link, the search engine studies the picture and brings back visually related results.
Because visuals dominate almost every online experience, image search has become a necessary part of how people explore information. It allows them to understand unfamiliar objects, discover similar visuals and find answers quickly.
Image Search Techniques Used Across the Internet Today
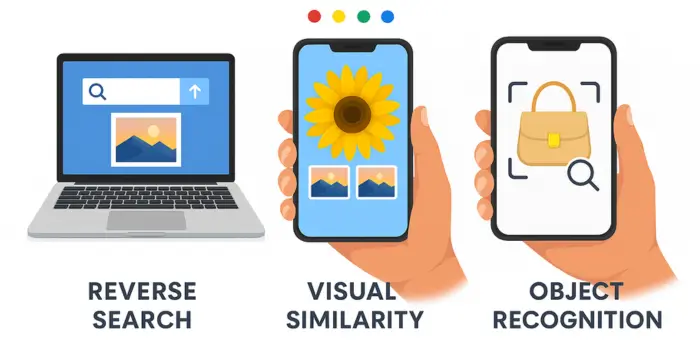
Image search includes a variety of techniques because users have different goals. Some people want to find pictures using a written description, while others want to check where an image came from. To meet all these needs, search engines use different image search techniques to deliver accurate results.
Below are the Image search techniques used across the internet today.
1) Keyword Image Search
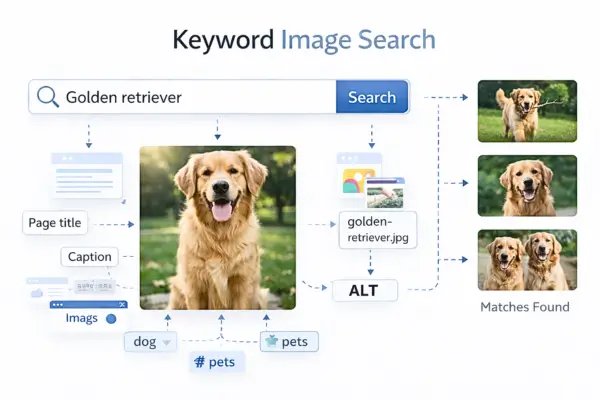
Keyword image search is the classic method where you type words and the search engine shows images that match your words. It decides what an image is about using text information linked to the image, such as the page title, captions, file name, tags, and alt text. It also looks at the text around the image on the webpage to understand context.
This technique is best when you already know what to call something, like “gold necklace design” or “modern kitchen interior.” It can feel inaccurate when images are poorly labeled or when your search words are too broad. To improve results, add details like color, material, location, brand, or style, for example “black leather tote bag minimal design.”
Tools:
- Google Images
- Bing Images
- Yahoo Images
- DuckDuckGo Images
- Brave Search Images
- Baidu Images
2) Reverse Image Search
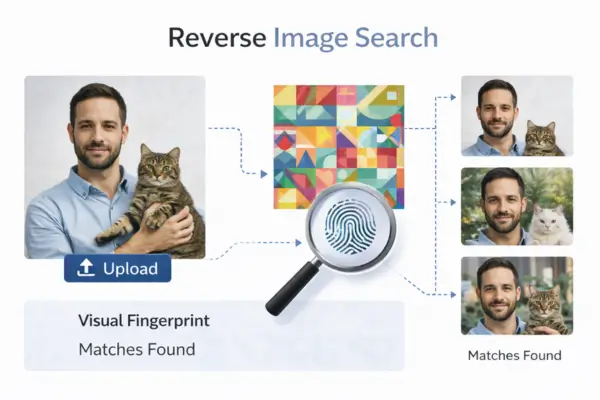
Reverse image search lets you search using a picture instead of text. You upload an image or paste an image link, then the system compares it against images already indexed online to find exact matches or very close versions. Many reverse search tools can recognize resized copies, cropped versions, and lightly edited variations.
This technique is mainly used to find where an image came from, where else it appears, or whether it has been reposted in a misleading way. It is useful for fact-checking viral images, tracking stolen photos, and finding the earliest known upload. For better results, try uploading a higher-quality version of the image and also test more than one search engine.
Tools:
- Google Images Search by image
- TinEye
- Bing Visual Search
- Yandex Images
- Baidu Images
- SauceNAO
3) Text in Image Search
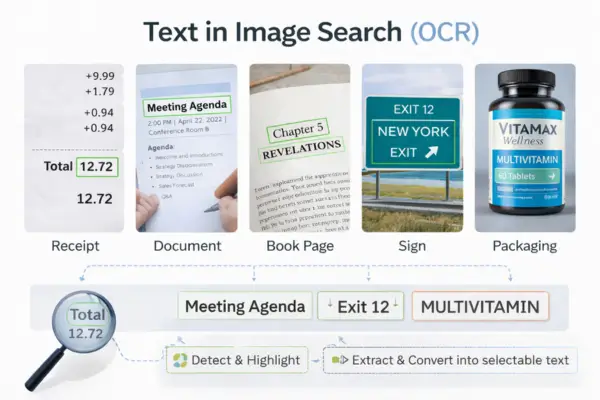
Text in image search uses OCR, which means the tool reads text inside a picture. This includes screenshots, documents, book pages, signs, receipts, packaging labels, and posters. The system detects letters and words, then converts them into selectable and searchable text.
This technique is helpful when you cannot type the text easily or you want to quickly search, copy, or translate what you see. Students use it for notes, travelers use it for street signs and menus, and professionals use it for documents and product labels. For best accuracy, use a sharp image, good lighting, and keep the text as straight as possible.
Tools:
- Google Lens
- Microsoft Lens
- iOS Live Text
- Adobe Scan
- Microsoft OneNote
4) Visual Similarity Search
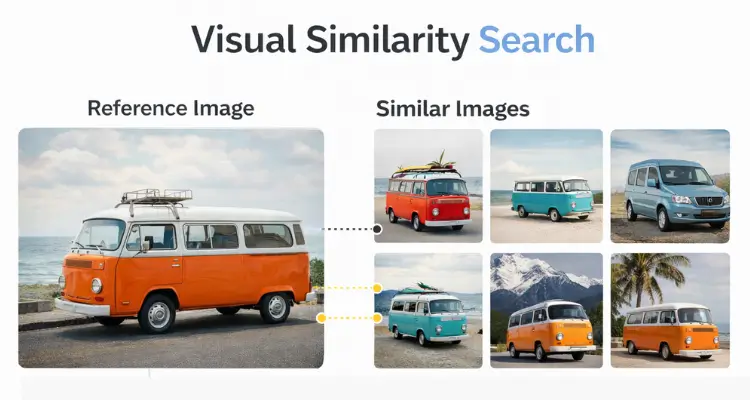
Visual similarity search finds images that look similar to your image, even if they are not the exact same file. It compares visual features like shapes, textures, color combinations, layout, and overall style. This makes it different from reverse image search, because it focuses on “similar appearance” instead of “same image.”
This technique is perfect for discovery and inspiration. People use it to find similar outfits, furniture, room designs, wallpapers, and graphics when they do not know the correct name or brand. If results are too broad, crop the image to the most important item and remove distracting background areas.
Tools:
- Google Images visually similar
- Bing Visual Search
- Pinterest Lens
- Google Lens
5) Color and Pattern Search
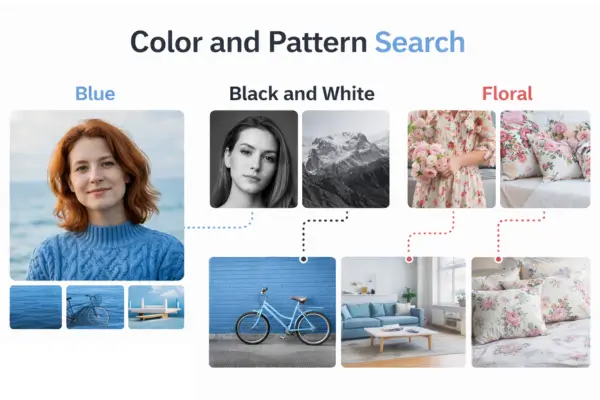
Color and pattern search helps you find images that match a specific color palette or repeating design. Instead of focusing on the object name, it focuses on visual filters like “blue tones,” “pastel,” “black and white,” or patterns like floral, stripes, and geometric textures. Many image platforms support color filtering to narrow results quickly.
This is widely used in branding, design, and marketing because consistent colors make a project look professional. It helps when creating mood boards, website themes, ad creatives, and social media aesthetics. To get better results, combine color filters with a simple keyword, for example “blue abstract background” or “beige minimal interior.”
Tools:
- Google Images color filters
- Bing Images filters
- Shutterstock
- Adobe Stock
6) Object Recognition Search

Object recognition search uses AI to detect objects inside an image and identify what they are. It can recognize items like plants, animals, electronics, furniture, tools, cars, and clothing. Some tools can detect multiple objects at once and highlight each one for separate searching.
This technique is best when you do not know the name of something but you can take a picture of it. It is used for learning, shopping, repair help, and general curiosity. For best results, keep the object clear, centered, and well-lit, and crop out unnecessary background before searching.
Tools:
- Google Lens
- Bing Visual Search
- CamFind
- Amazon app visual search
- eBay image search
7) Facial Recognition Search
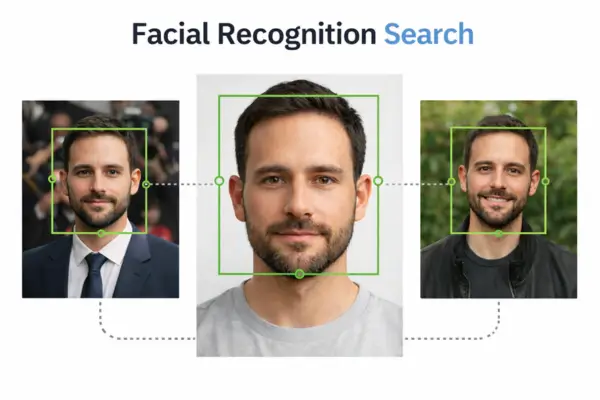
Facial recognition search analyzes a person’s face by measuring facial features and patterns. It then compares those features with other images to find possible matches. This can help identify the same person across different photos, even if the image is taken from a different angle or under different lighting.
It is used for finding where a person appears across photos, organizing photo libraries by grouping similar faces, and spotting impersonation in some contexts. Results can vary depending on the tool and the image quality, so people often try more than one platform when searching for a match.
Tools:
- Yandex Images
- PimEyes
- FaceCheck
- Google Photos
- Apple Photos
8) Logo and Brand Recognition
Logo and brand recognition detects a logo or brand mark inside an image. It looks for unique shapes, typography, and design patterns, even when the logo is small on clothing, packaging, storefronts, or product photos. Once it recognizes the logo, it tries to connect it to the correct brand and related pages.
This technique is useful when you see a logo but do not know the brand name. It is also used by businesses to monitor brand presence and spot unauthorized logo usage in public images. For best results, crop tightly around the logo area and make sure the logo is not blurry.
Tools:
- Google Lens
- Bing Visual Search
- Google Images
- Yandex Images
9) AI Generated Image Detection
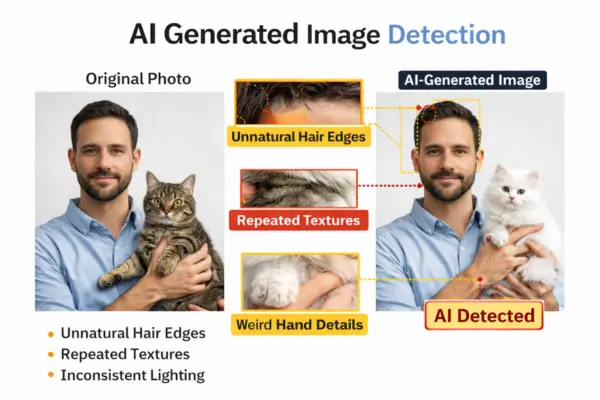
AI-generated image detection tries to determine whether an image was created using AI. Many detectors look for common generation signs, such as unnatural textures, repeating patterns, inconsistent lighting, or strange fine edges around details like hair, hands, and text.
This technique is used to reduce misinformation and confirm authenticity before sharing content. It is especially helpful when an image looks unusually perfect or unrealistic, or when it contains small visual errors that do not match natural photography.
Tools:
- Hive
- Illuminarty
- Reality Defender
10) Scene and Context Recognition
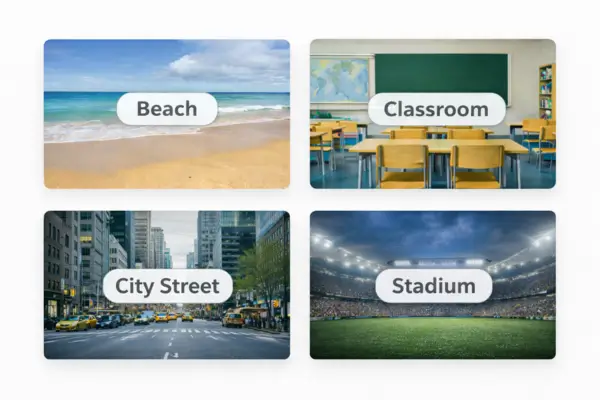
Scene and context recognition focuses on understanding the environment in an image. Instead of only identifying objects, it recognizes the setting like a beach, city street, forest, classroom, restaurant, stadium, or event environment. It uses background cues, lighting, architecture, and layout patterns to classify the scene.
This technique is useful for travel discovery, education, and content recommendations. For example, if you upload a street photo, it may suggest similar places or related travel content. If you want better scene results, include more background in the image and avoid cropping too tightly around a single object.
Tools:
- Google Lens
- Bing Visual Search
- Yandex Images
- Google Images
- Apple Visual Look Up
11) Geolocation / Visual Landmark Matching

Geolocation or visual landmark matching is an image search technique that helps identify where a photo was taken by analyzing visual clues such as landmarks, architecture, terrain, road patterns, and skyline features. The system compares these elements with large databases of known places and suggests likely locations based on similarity.
This technique is widely used for verifying images shared online, investigating viral content, and discovering travel destinations. It works best when the image includes clear background details like buildings, mountains, or recognizable landmarks.
Tools:
- GeoSpy AI
- Google Maps Street View
- Google Earth
- Mapillary
- PeakVisor
- SunCalc
12) Metadata-Based Image Search
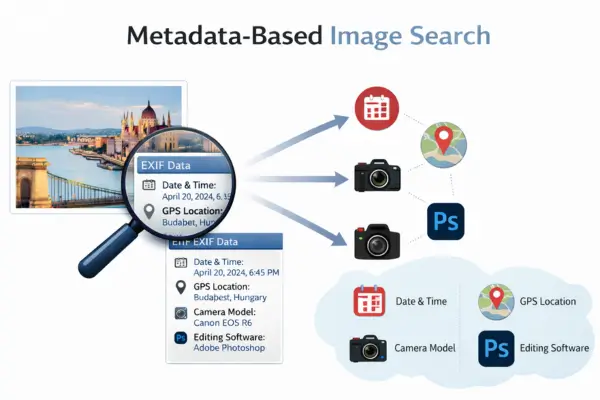
Metadata-based image search focuses on hidden information stored inside image files, also known as EXIF data. This information may include the date, time, GPS location, camera model, and editing software used to create the image.
Unlike visual search methods, this technique does not analyze what appears in the image. Instead, it helps reveal when, where, and how the image was created, if the metadata is still available. It is commonly used for photo verification, journalism, and photography workflows. Original image files usually provide the most accurate results.
Tools:
- ExifTool
- Pic2Map
- GeoImgr
- Online EXIF Viewer
Which Image Search Technique Is Best and When to Use It
Choosing the best image search technique depends on what you want to find. Every method works differently, so using the right one can save time and give you much better results. Some techniques are perfect for everyday browsing, while others are designed for checking the truth behind an image, finding similar products or identifying objects and faces. Understanding these differences helps you pick the method that fits your goal, instead of relying on one tool for everything.
When you want to find the original source of an image
Use reverse image search when you need to know where an image first appeared online. This is the best option for finding the original page, the earliest upload, or the first website that published the photo.
TinEye is strong for exact match tracking and finding older versions, while Google Images can show more “similar” results and more websites. If one tool fails, run the same image on both to improve accuracy.
When you want to identify an unknown object or product
Use object recognition when you do not know the name of what you are looking at. This technique works best when the main item is clear, centered, and not hidden by clutter or heavy filters.
Google Lens is usually the fastest for real-world objects, and Bing Visual Search is great for shopping items like furniture, clothes, gadgets, or décor. If the results are wrong, crop the image tightly around the object and try again.
When you need to extract text from screenshots, signs, or documents
Use text in image search when the photo contains words that you want to read, copy, or search. This is useful for screenshots, signboards, packaging labels, book pages, and even handwritten notes in some cases.
Google Lens OCR can pull out the text and let you copy it instantly, and it also helps with translation. For best results, use a sharp image with clear lighting so the text edges are readable.
When you want to detect a logo or identify a brand
Use logo and brand recognition when the image contains a logo, symbol, or brand mark. This technique is helpful when you see a small logo on clothing, packaging, or product photos but cannot recognize it.
Google Lens is strong at detecting logos, but you often get better results if you crop the image only around the logo area. After you identify the brand, use a keyword search to confirm the product type and official website.
When you want to verify a viral image or check if it is misleading
Use reverse image search for verification when you want to confirm whether an image is real, old, edited, or used in the wrong context. This is one of the most important techniques for fact-checking and avoiding misinformation.
Run the image through Google Images and TinEye, then compare the oldest results and the websites that used it first. Always check captions, upload dates, and reliable publishers before believing what the image claims.
Common Mistakes Users Make When Searching Images and How to Avoid Them
Many users upload the wrong kind of image and blame the tool. Fixing these mistakes makes your results much more accurate. These are the most common problems.
Using Low Quality or Heavily Filtered Photos
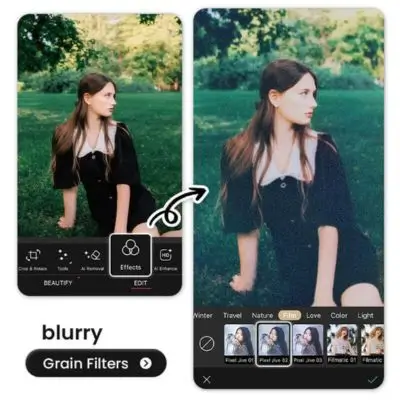
Filters change colors and textures. This confuses similarity and object recognition. Use the original image when possible, or reduce filters before searching.
Low resolution images also hide details. If you must use a screenshot, zoom and crop so the main subject is clear. Try to avoid screenshots with UI icons covering the subject.
Using Only One Tool
Each tool has different strengths. Google is broad, TinEye is good at duplicates, Bing is good for shopping, and Pinterest is good for style inspiration. Using only one tool limits your success rate.
A simple workflow is Google first, then TinEye for exact match, then Bing or Pinterest for similar style. This gives wide coverage without wasting time.
Ignoring Context and Source Quality
Finding a match is not the same as finding truth. Some websites repost images with fake stories. Always check where the image came from and whether the publisher is reliable.
For sensitive topics, look for credible news sites, official sources, or the original creator. Do not trust random reposts as proof.
Searching the Whole Image Instead of the Main Subject
If your image contains many objects, the tool may focus on the wrong one. Crop to the object you care about. If the tool supports selection boxes, highlight the specific area.
This is especially important for shopping. Selecting the exact jacket in an outfit photo gives better results than searching the full image.
Using Outdated or Irrelevant Images

Images that are old or outdated often produce inaccurate results. Products change designs, logos get updated and places look different over time. If you upload an old image, the system may show outdated or irrelevant information related to the older version.
Using a recent image helps the search engine display current results that match today’s visuals. This is especially important for identifying brands, verifying product availability or researching recent events.
Simple Tips to Improve Your Image Search Results Every Time
Most bad image search results happen because the input image is weak. Small improvements in what you upload can dramatically increase accuracy. Use these tips before you assume the tool is wrong.
Use a Clear and High Quality Image
Blurry images remove edges and details that engines need. If possible, use the original image instead of a screenshot. Avoid compressed WhatsApp forwards when doing serious checks.
If the subject is small, crop closer to the main object. A tighter crop helps the tool focus on the correct item. Keep the crop clean so you do not cut off key features.
Remove Unnecessary Background Noise
Busy backgrounds confuse object detection. If you are searching a product, crop out hands, shelves, or unrelated items. If you are searching a landmark, keep the building but remove unrelated overlays.
Lighting matters a lot. Natural light gives better color and edges. If the image is too dark, increase brightness slightly before searching.
Try Multiple Versions of the Same Image
If you are not getting good results, test variations. Upload the original and a cropped version. Rotate the image if it is sideways. Try a version with slightly adjusted contrast.
Sometimes an engine misses the exact match but another engine finds it. Testing Google, Bing, and TinEye often solves this problem.
Use Filters and Advanced Options
Filters reduce junk results. If you need a usable image for a website, use size filters to find large images. If you need a legal image, use usage rights filters where available.
If your search is for a product, try adding a keyword after the visual search. For example, upload a shoe image, then add “men running shoe” in the query area.
Combine Techniques for Stronger Verification
For verification, do not rely on one method. Use reverse image search, then check the page date and context. Compare multiple sources and look for the earliest credible publisher.
If the image contains text, run OCR and search the extracted words. Text often reveals the real context faster than visuals alone.
